Release Note
Reporting Systems

1) “View Status” flow
Click “Reporting Systems” in the menu
![]()
You will be directed to the table of Reporting Systems.
Here is an example of a blank table:

Here is an example of a table with all systems are in Draft mode:
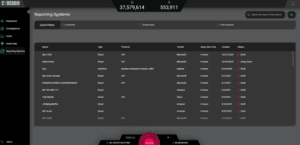
Here is an example of a table of systems with various types of statuses:

2) “Connect New System” flow
Click on the “Plus” button in the top right corner

See the list of supported systems

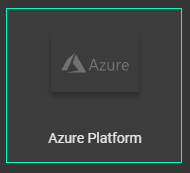
Select the system you would like to connect (see an example of “Azure” below)
Confirm the details of the system selected
![]()
Name your system

Click “Connect”

See the Reporting System Wizard

Some steps only contain instructions, those instructions are shown on the left side of the wizard
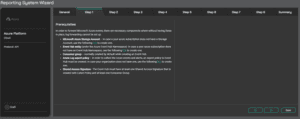
Some steps also contain fields that the user needs to fill in, those fields are shown on the right side of the wizard

The last step of the wizard is the “Summary”, which details all the remaining fields to be filled in by the user

Once all fields are properly filled, the “Submit” button is enabled
![]()
The submitted system will then be added to the table so you can track its connection status
If you leave the wizard before completion, the status will be left as “Draft”